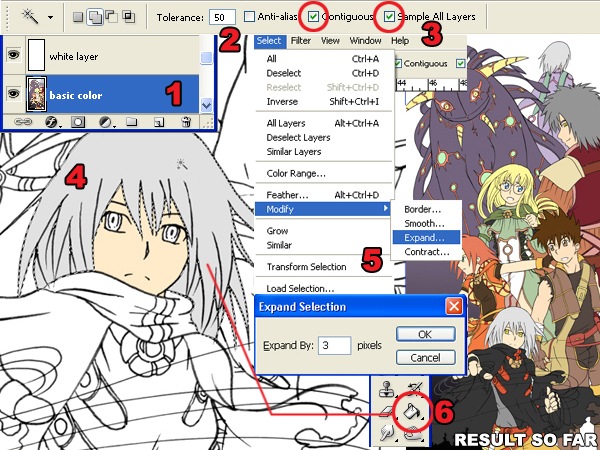
Now that we have the outline and white background separated, we can add the base color.

- Add a new layer below the white layer.
- Select the Magic Wand tool and, in the option bar, set the Tolerance to 50.
- In the option bar, checkmark the Contiguous and Sample All Layers options.
- With the Magic Wand tool selected, click where you want to add color.
- Expand the selection by 3 pixels using the Expand command (Select > Modify > Expand). If you are using Windows, you can press Alt, S, M, E on your keyboard to quickly access this menu item.
- Use the Paint Bucket tool to fill the selection with a color of your choice. Use the same technique (Create a selection with the Magic Wand tool then fill with the Paint Bucket tool) for the entire image.
Step 4 – Adding Shadows
In this part, you’ll learn how to add shadows to the image. One important technique from this step is how to select the correct color.

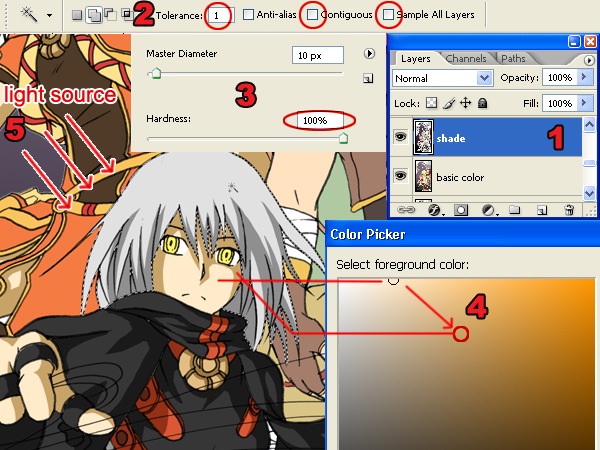
- Create a new layer and position it between the white layer and the base color layer.
- Select the Magic Wand tool and set the tolerance to 1 (so that it will only pick one color) and uncheck the Contiguous and Sample All Layers options.
- Select the Brush tool and set the hardness to 100%. This will give the brush a sharp edge.
- In the Tools palette, click on the foreground color. This will bring up the Color Picker window. Select the base color from where you want to start. This will give us the hue of the color. Move the slightly off the area to change the saturation and brightness of the color.
- Paint the shadows. Be sure to pay attention to where the light is coming from to get proper looking shadows.
Step 5 – Dodge and Burn
The Dodge and Burn tool will be used to give a gradient tone effect to the solid colors.

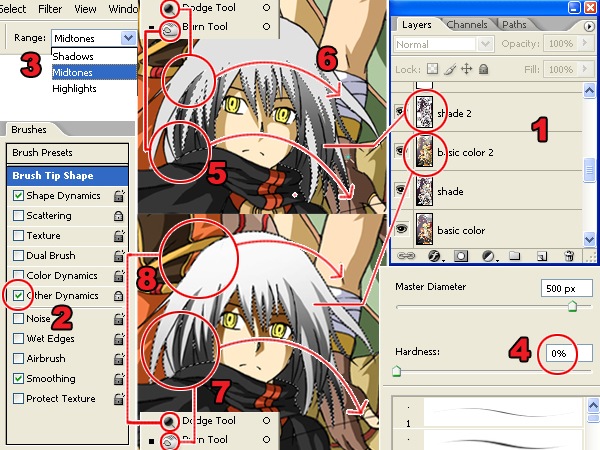
- Duplicate the layers with the base color and shadow then position them above the original base color and shadow layers. The new layers will be used for dodging and burning while the old layers will be used to load selection with the Magic Wand tool. Select the layer with the base color and use the Magic Wand tool to create a selection of an area that you want to edit. In the image above, we created a selection of the hair.
- When using the Dodge or Burn tool, turn on the “Other Dynamics” option in the Brushes palette (Window > Brushes).
- Also, in the Dodge or Burn tool options, set the range option to Midtones.
- When using the Dodge or Burn tool, set the hardness to 0%.
- Select the top shadow layer (shade 2 in the screenshot). You will be using the Dodge and Burn tool to create a gradient in the shadows. Start with the Burn tool to darken the areas in a smooth motion on the lower part of the shadow.
- On the same layer, select the Dodge tool and lighten the upper part of the shadow.
- Select the duplicated layer with the base color. Use the Dodge tool to lighten the upper area of the base color.
- Use the Burn tool to burn the lower area of the base color.
Step 6 – Adding Reflected Light
In this step, you’ll learn how to add light reflected from the ambient light.

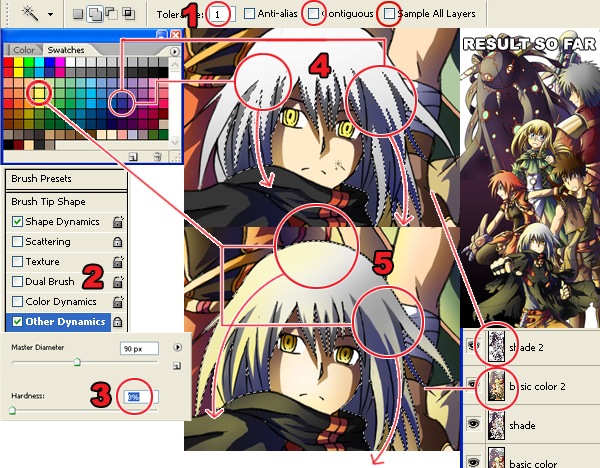
- Use the same setting as previously used for the Magic Wand tool.
- Turn on the “Other Dynamics” setting in the Brush palette (Window > Brushes).
- Set the Brush hardness to 0%.
- For this image, a dark purple color was used to shade the area with no reflected light. The light source is from the left of the image so the right side of the characters were painted with dark purple.
- A light yellow color was used to shade the areas facing the ambient light.
No comments:
Post a Comment